采用 Material UI 创建React响应式导航栏
2024-06-07 渥太华微生活

相关链接:
采用 React Bootstrap 创建React响应式导航栏
采用 Material UI 创建React响应式导航栏
参考Material UI官方网站:
https://mui.com/
1、安装 React及其依赖
1) 安装 react, react-dom,@vitejs/plugin-react,react-router-dom,@material-ui/core,和 @material-ui/icons:
npm install react react-dom @vitejs/plugin-react react-router-dom @material-ui/core @material-ui/icons
2) 更新 vite.config.js:
import { defineConfig } from 'vite';
import laravel from 'laravel-vite-plugin';
import react from '@vitejs/plugin-react';

export default defineConfig({
    plugins: [
        laravel({
            input: ['resources/css/app.css', 'resources/js/app.jsx'],
            refresh: true,
        }),
        react(),
    ],
});
2、更新主页:
更新 resources\views\welcome.blade.php
<!DOCTYPE html>
<html lang="{{ str_replace('_', '-', app()->getLocale()) }}">

<head>
    <meta charset="utf-8">
    <meta name="viewport" content="width=device-width, initial-scale=1">

    <title>React Test</title>

    @viteReactRefresh
    @vite('resources/js/app.jsx')
</head>

<body>
    <div id="app"></div>
</body>

</html>
3、创建路由
resources/js/app.jsx:
import 'bootstrap/dist/css/bootstrap.min.css';
import '../css/app.css';
import ReactDOM from 'react-dom/client';
import { Route, BrowserRouter as Router, Routes } from 'react-router-dom';
import Navbar from './components/Navbar';
import Home from './pages/Home';
import About from './pages/About';
import Contact from './pages/Contact';
import Faq from './pages/Faq';
import NotFound from './pages/NotFound';

ReactDOM.createRoot(document.getElementById('app')).render(
    <div className="">
        <Router>
            <Navbar />
            <Routes>
                <Route exact path='/' element={ <Home /> } />
                <Route path='/about' element={ <About /> } />
                <Route path='/contact' element={ <Contact /> } />
                <Route path='/faq' element={ <Faq /> } />
                <Route path="*" element={ <NotFound /> } />
            </Routes>
        </Router>
    </div>
)
4、创建所有页面
1) resources\js\pages\Home.jsx
export default function Home() {
    return (<h1>Home Page content</h1>);
}
2) resources\js\pages\About.jsx
export default function About() {
    return (<h1>About Page content</h1>);
}
3) resources\js\pages\Contact.jsx
export default function Contact() {
    return (<h1>Contact Page content</h1>);
}
4) resources\js\pages\Faq.jsx
export default function Faq() {
    return (<h1>Faq Page content</h1>);
}
5) resources\js\pages\NotFound.jsx
export default function NotFound() {
    return (<h1>NotFound Page content</h1>);
}
5、创建导航栏组件
1) 创建基本导航栏组件(为大屏幕用):
resources\js\components\Navbar.jsx
import { AppBar, CssBaseline, Toolbar, Typography, makeStyles } from "@material-ui/core";
import { BorderBottom } from "@material-ui/icons";
import { Link } from "react-router-dom";

const useStyles = makeStyles((theme) => ({
    navlinks: {
        marginLeft: theme.spacing(10),
        display: "flex",
    },
    logo: {
        flexGrow: "1",
        cursor: "pointer"
    },
    link: {
        textDecoration: "none",
        color: "white",
        fontSize: "20px",
        marginLeft: theme.spacing(20),
        "&:hover": {
            color: "yellow",
            BorderBottom: "1px solid white",
        },
    },
}));

export default function Navbar() {
    const classes = useStyles();

    return (
        <AppBar position="static">
            <CssBaseline />
            <Toolbar>
                <Typography variant="h4" className={classes.logo}>
                    Navbar
                </Typography>
                <div className={classes.navlinks}>
                    <Link to="/" className={classes.link}>
                        Home
                    </Link>
                    <Link to="/about" className={classes.link}>
                        About
                    </Link>
                    <Link to="/contact" className={classes.link}>
                        Contact
                    </Link>
                    <Link to="/faq" className={classes.link}>
                        FAQ
                    </Link>
                </div>
            </Toolbar>
        </AppBar>
    );
}
2) 创建 Drawer 组件(为小屏幕用):
resources\js\components\Drawer.jsx
import { Drawer, IconButton, List, ListItem, ListItemText, makeStyles } from "@material-ui/core";
import MenuIcon from '@material-ui/icons/Menu';
import { useState } from "react";
import { Link } from "react-router-dom";

const useStyles = makeStyles(() => ({
    link: {
        textDecoration: "none",
        color: "blue",
        fontSize: "20px"
    },
    icon: {
        color: "white"
    }
}));

export default function DrawerComponent() {
    const classes = useStyles();
    const [openDrawer, setOpenDrawer] = useState(false);

    return (
        <>
            <Drawer
                open={openDrawer}
                onClose={() => setOpenDrawer(false)}
            >
                <List>
                    <ListItem onClick={() => setOpenDrawer(false)}>
                        <ListItemText>
                            <Link to="/" className={classes.link}>Home</Link>
                        </ListItemText>
                    </ListItem>
                    <ListItem onClick={() => setOpenDrawer(false)}>
                        <ListItemText>
                            <Link to="/about" className={classes.link}>About</Link>
                        </ListItemText>
                    </ListItem>
                    <ListItem onClick={() => setOpenDrawer(false)}>
                        <ListItemText>
                            <Link to="/contact" className={classes.link}>Contact</Link>
                        </ListItemText>
                    </ListItem>
                    <ListItem onClick={() => setOpenDrawer(false)}>
                        <ListItemText>
                            <Link to="/faq" className={classes.link}>FAQ</Link>
                        </ListItemText>
                    </ListItem>
                </List>
            </Drawer>
            <IconButton onClick={() => setOpenDrawer(!openDrawer)}>
                <MenuIcon />
            </IconButton>
        </>
    );
}
3) 组合上面两个,修改Navbar.jsx成为响应式导航栏(大小屏幕使用均可):
resources\js\components\Navbar.jsx
import { AppBar, CssBaseline, Toolbar, Typography, makeStyles, useMediaQuery, useTheme } from "@material-ui/core";
import { Link } from "react-router-dom";
import DrawerComponent from "./Drawer";

const useStyles = makeStyles((theme) => ({
    navlinks: {
        marginLeft: theme.spacing(5),
        display: "flex",
    },
    logo: {
        flexGrow: "1",
        cursor: "pointer"
    },
    link: {
        textDecoration: "none",
        color: "white",
        fontSize: "20px",
        marginLeft: theme.spacing(20),
        "&:hover": {
            color: "yellow",
            borderBottom: "1px solid white",
        },
    },
}));

export default function Navbar() {
    const classes = useStyles();
    const theme = useTheme();
    const isMobile = useMediaQuery(theme.breakpoints.down("md"));
    console.log(isMobile);

    return (
        <AppBar position="static">
            <CssBaseline />
            <Toolbar>
                <Typography variant="h4" className={classes.logo}>
                    Navbar
                </Typography>
                {isMobile ? (
                    <DrawerComponent />
                ) : (
                    <div className={classes.navlinks}>
                        <Link to="/" className={classes.link}>
                            Home
                        </Link>
                        <Link to="/about" className={classes.link}>
                            About
                        </Link>
                        <Link to="/contact" className={classes.link}>
                            Contact
                        </Link>
                        <Link to="/faq" className={classes.link}>
                            FAQ
                        </Link>
                    </div>
                )}
            </Toolbar>
        </AppBar>
    );
}
6、运行测试
在一个终端运行 VITE server
npm run dev
在另一个终端运行 Laravel server
php artisan serve
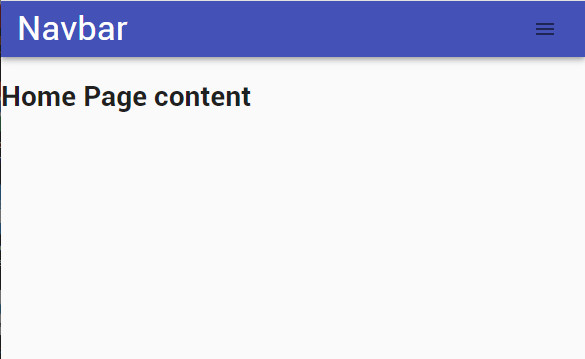
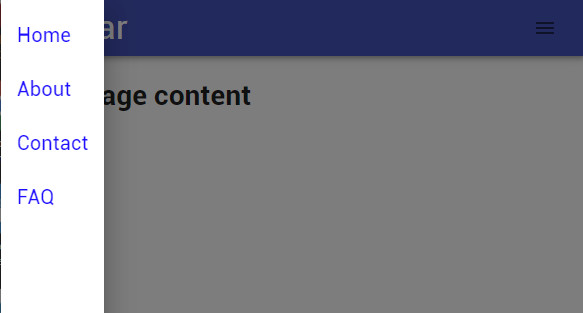
测试结果如下图:
在电脑屏幕上:

在手机屏幕上:
| 全部评论 (0) |
|---|

